Integration Guide
The thiss-js software is a complete discovery solution compatible with any MDQ service that implements the search extensions for instance pyff.io or thiss-mdq. Regardless of whether you deploy your own instance of thiss-js or if you connect to an existing service - e.g., the service.seamlessaccess.org Demo Service, you need to integrate the instance into your SP. The examples below all assume a SAML SP but it is likely relatively easy to provide a similar solution for OpenIDC or other identity protocols that rely on redirects.
NOTE: In the examples below we’ll assume you are integrating with service.seamlessaccess.org - if you are deploying your own instance of thiss-js, substitute this domain for your own in the various configuration examples below.
The Seamless Access Implementation “Flavors”
The Coalition for Seamless Access provides the thiss service to enable several different “flavors” of implementation:
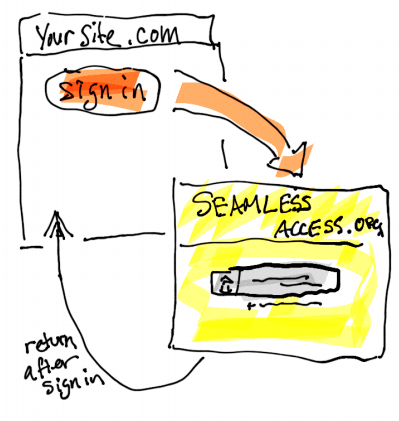
- Limited - lets you use the Seamless Access discovery service for users to find and sign into their preferred Identity Provider, but doesn’t integrate this service into your site.
- This involves an implementation of the SAML identity provider discovery protocol
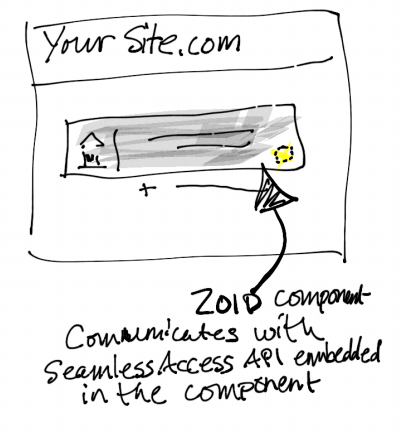
- Standard - lets you use the Seamless Access service to display the button on your site, and use the Seamless Access discovery and persistence services as integrated components on your site.
- This involves the use of a browser-based login button component you can display on your site that is integrated with the Seamless Access service.
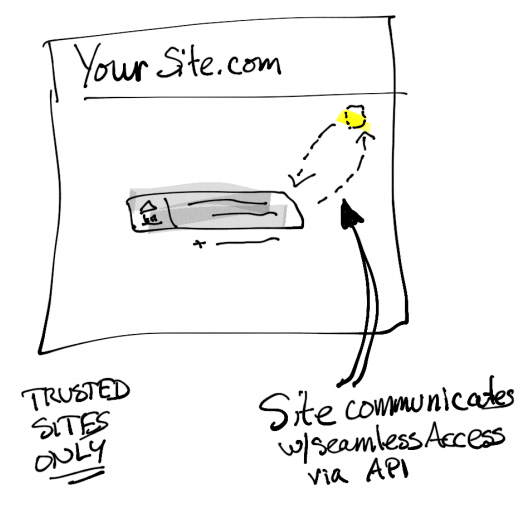
- Advanced - provides you with the Seamless Access persistence service while giving you greater control over the appearance of the service on your site, and what Identity Providers (IdPs) you include in your discovery service.
- This includes the use of a jQuery plugin for implementing your own discovery service on top of the thiss-js infrastructure. This option should only be attempted if your SP requires a custom search interface or relies on a non-standard SAML metadata feed, but you still want the user’s browser to be able to remember their login choice across several SPs (persistence.)
Implementing a “Limited” Integration
For the “Limited” flavor, you will implement:
- Discovery Service Integration - Integrate the Seamless Access service to use it as your Discovery Service.
Discovery Service Integration
By far the easiest integration is to use Seamless Access service as a standard SAML identity provider discovery service (DS). The DS URL is https://service.seamlessaccess.org/ds - you will use this URL in your SPs configuration where appropriate. Here is how to do this for some common SP software stacks:
Shibboleth
In the file /etc/shibboleth/shibboleth.xml modify the SSO element to read:
<SSO discoveryProtocol="SAMLDS" discoveryURL="https://service.seamlessaccess.org/ds/">
   SAML2
</SSO>
For a complete set of options related to discovery see the shibboleth documentation.
SimpleSAMLphp
In authsources.php (relative to the SSP config directory) find your SAML authentication source (often named ‘default-sp’) and set the discoURL parameter to https://service.seamlessaccess.org/ds/:
'default-sp' => array(
    'saml:SP',
    'entityID' => NULL,
    'discoURL' => 'https://service.seamlessaccess.org/ds/',
    ....
),
For more details visit the SSP documentation.
Implementing a “Standard” Integration
For the “Standard” flavor, you will implement:
- Discovery Service Integration - See the section above for instructions.
- Display of Seamless Access Login Button - Use the Seamless Access service to display the login button component on your SP login page.
- Integration of Login Button with your SAML SP - Integrate the Seamless Access service to use it as your Discovery Service.
With the “Standard” Integration, you will be using the active login button which uses the browser local store to remember and present the last Identity Provider selection made by the user. For most use-cases this completely eliminates the search/find/select UX for most interactions with your SP since most users rely on the same IdP for all their logins to a site.
Display of Seamless Access Login Button
Including the component library
You will need to reference the Seamless Access component library before you can use it. For the Standard implementation, you will always reference through a CDN:
<head>
<!-- Include the Seamless Access Sign in Button & Discovery Service -->
<script src="https://service.seamlessaccess.org/thiss.js"></script>
</head>
Rendering the button
Include a <div> container that is identified with an id tag where you want the button to appear on your HTML page:
<body>
  <!-- Location for the Seamless Access login button -->
  <div id='putMyLoginButtonHere'></div>
</body>
And to display the button into this container, invoke the DiscoveryComponent.render function as a handler for the onload event on the window. This action will cause the button to initialize as soon as the window has finished loading. (NOTE: while it is possible to initialize the button component earlier, the behavior can be unpredictable and is not recommended.)
<script>
window.onload = function() {
  // Render the Seamless Access button
  thiss.DiscoveryComponent.render({
    loginInitiatorURL: 'https://sp.example.com/Shibboleth.sso/Login?target=https://sp.example.com/',
  }, '#putMyLoginButtonHere');
};
</script>
The render function in this code, takes two parameters:
- The
loginInitiatorURL:- See the next section, “Integration of Login Button with your SAML SP”, for more details - The location where to render the button - here you will use the id tag that you used for your html
<div>container, formatted using CSS selector styling in quotes.
Content-Security-Policy considerations
If your website publishes a Content-Security-Policy you will need to make provision for the components served from the service.seamlessaccess.org CDN (or from your domain if you deploy your own version of thiss) by merging the following into your existing CSP:
Content-Security-Policy: script-src 'unsafe-inline' service.seamlessaccess.org; frame-src service.seamlessaccess.org;
The 'unsafe-inline' is required for the above DiscoveryComponent.render example, but could be removed if the onload function was included e.g. from a file.
Integrating the Login Button with your SAML SP
The first step is easy to describe in general but the second step depends on exactly how your SAML implementation works. We provide examples below for the Shibboleth SP but if you run something other than Shibboleth you need to consult your documentation to figure out how the integration works.
The example above works out of the box for Shibboleth assuming you have configured https://service.seamlessaccess.org/ds as the discovery service as in the example above. The Shibboleth simplified SP configuration uses the URL /Shibboleth.sso/Login to trigger an authentication request using the discovery service configured in the <SSO> element.
In general the idea is to provide two hooks for the button component:
- A way to initialize a SAML discovery protocol request in the SAML SP
- A way to receive the response from the SAML discovery protocol request
For Shibboleth the loginInitiatorURL serves both purposes but in general you need to provide two parameters discoveryRequest and discoveryResponse which can be either URLs (in which case a redirect is performed) or JavaScript functions that are called by the component.
The discoveryRequest function is called with a single argument containing a JS object representing the chosen IdP - parameters include entity ID, icon, title etc. Normally this function will be used to initialize a SAML authentication request to the identity provider identified by entity.entityID.
For Shibboleth this is all handled by providing the single loginInitiatorURL parameter as in the example above.
Implementing an “Advanced” Integration
For the “Advanced” flavor, you will implement:
- Download and edit the Seamless Access Discovery service software - you will use this set of clients to configure both persistence and discovery services for your custom service
- Use the Seamless Access API - Use these clients to interact with the persistence service when using your own discovery service.
The “Advanced” integration is significantly more complicated than the other implementations, and should only be used if you are unable to achieve your discovery and/or UX experiences otherwise.
The Seamless Access Discovery Service Software
Seamless Access is registered as a package on npm. You can install the latest version of Seamless Access with the npm CLI command
> npm install [--save] @theidentityselector/thiss-ds
Once downloaded, you can reference the (edited) software in your HTML.
<head>
<!-- Include the downloaded Seamless Access Discovery Client API -->
<script src="/thiss-ds.js"></script>
</head>
Use the Seamless Access API
The documentation for the API can be found in the software README file.